Installing QDD-galaxy as Virtual Machine
- Download and install Oracle virtual box appropriate to
your computer from
https://www.virtualbox.org/wiki/Downloads.
The virtual Box is a manager that can handle different Virtual Machines.
- Host system refers to the Operating system of your computer.
- The guest operating system (the operating system of the VM) is Linux (Ubuntu-12.04.2).
- VirtualBox comes in many different packages, and installation depends on your host operating system. If you have installed software before, installation should be straightforward: on each host platform, VirtualBox uses the installation method that is most common and easy to use. If you run into trouble or have special requirements, please refer to Chapter 2: Installation details of the manual of Virtual Box for details about the various installation methods.
- You do not need to install extension packs.
- Download the Virtual Machine with QDD from the download page
- Start the Virtual Box (see manual of Virtual Box for help)
- Import the VM into the Virtual Box by choosing the 'Import appliance'
in the 'File' menu of the Virtual Box. (for more details see
manual of Virtual Box ).
When importing the VM, some settings - like the memory allocated to the VM and the number of CPUs - can be directly modified in the import window. By default 1 GB of RAM, and 1 CPU is set. You can also adjust these parameters later (see point 5).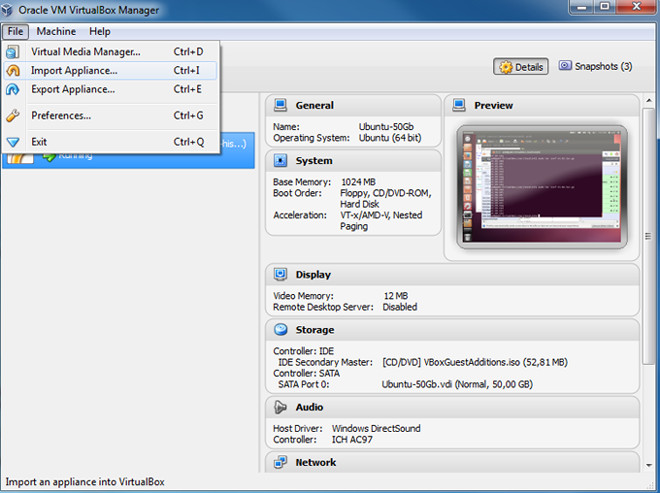
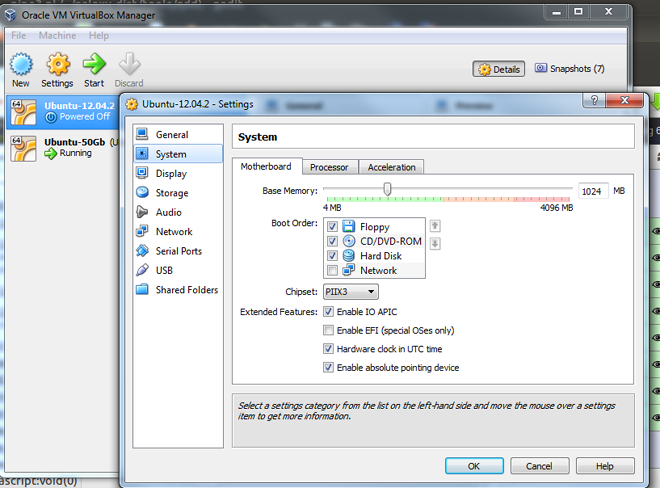
- Optional: By default 1 GB of RAM, and 1 CPU is set for the VM you have just imported. However, you can adjust the RAM and the number of CPU if you have a higher capacity. ( https://www.virtualbox.org/manual/ch01.html#configbasics)
- Open a the 'Settings' window by clicking on the Settings button in the menu.
- Select 'System' in the left panel of the window.
- Select the 'Motherboard' tab for changing the Base Memory (RAM). This sets the amount of RAM that is allocated to the VM when it is running. The specified amount of memory will be requested from the host operating system, so it must be available or made available as free memory on the host when attempting to start the VM and will not be available to the host while the VM is running. (or details see www.virtualbox.org/manual/ch03.html#settings-motherboard )
- Select the 'Processor' tab for changing the number of CPU. You should not,
configure virtual machines to use more CPU cores than you have available
physically. ( for details see
https://www.virtualbox.org/manual/ch03.html#settings-processor)
Beware! If you have changed the number of CPU available to your VM, you will have to change the -num_threads parameter in the set_qdd_default.ini file See Setting parameters)
- Start the Virtual Machine
Double-click on its entry in the list within the Manager window. This opens up a new window, and the virtual machine which you selected will boot up. Everything which would normally be seen on the virtual system's monitor is shown in the window. In general, you can use the virtual machine much like you would use a real computer.
Check the trouble shooting page if you have a problem at this stage.
- Keyboard setting
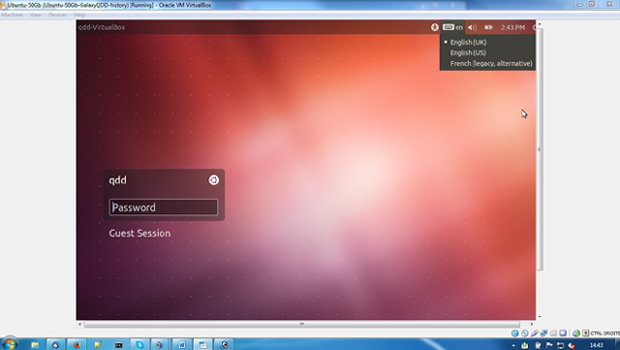
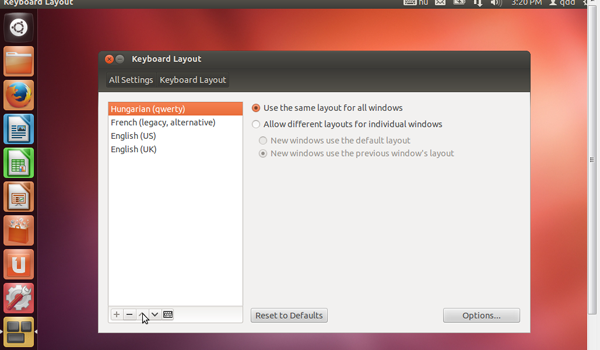
- Choose the keyboard setting closest to the one you are using, by clicking on the keyboard icon on the top right corner of your VM screen.
- Type the password 'qddGalaxy', to access the machine.
- If your keyboard does not correspond to the any of three proposed (English UK, English US, French) you can add yours.
- Click on the keyboard icon on the on the top right corner of your VM screen, and select 'Keyboard Layout Settings...'
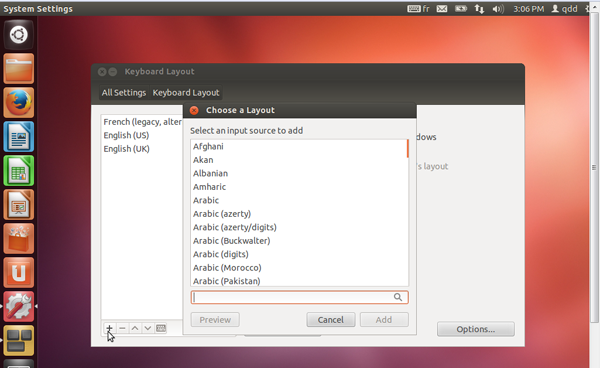
- Click on the '+' icon on the bottom left of the 'Keyboard Layout' window, to see available keyboard settings.
- Choose the keyboard of your choice and click on 'Add'
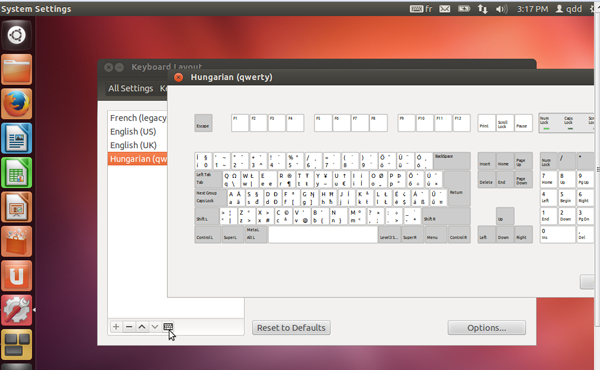
- This keyboard will appear in the left panel. Select it and click on the keyboard icon at the bottom left, to check if it corresponds to yours.
- Use the arrow icons at the bottom left of the window, to put this keyboard at the top of the list.
- Close the window, it's all set....

...Well almost all set. In the VM you have just installed, QDD, Galaxy server and all essential third party programs are installed and ready to use. However, you cannot use RepeatMasker without downloading the RepeatMasker Libraries from GIRI (Genetic Information Research Institute). Since this database of repetitive elements is available freely only to academic users, we could not include it into the VM.
The other database you might need is the nucleotide database of NCBI. It is about 15 Gb and regularly updated, therefore it is better to download the last version directly to your VM.
Installing RepeatMasker Libraries (optional for running pipe4)
- Start a browser (Firefox) in the left application list of the VM display. Register at GIRI
- Download repeatmaskerlibraries-[version].tar.gz from http://www.girinst.org/server/RepBase/index.php
- Open a terminal by clicking on the Ubuntu icon in the top left corner of the VM display and type 'terminal' in the search box, and the click on the terminal icon that appears
- In the terminal type (or copy) the following commands which will copy
the repeatmasker libraries into the RepeatMasker folder:
sudo cp ~/Downloads/repeatmaskerlibraries* /usr/local/RepeatMasker/
(sudo is a command that allows you to modify protected files. It will prompt you to type the password 'qddGalaxy'. Don't be surprised if the cursor is not moving when you type the password.)
Now type (or copy) the following commands to unpack the repeatmasker library:
cd /usr/local/RepeatMasker
sudo gunzip repeatmaskerlibraries-*.tar.gz
sudo tar xvf repeatmaskerlibraries-*.tar
sudo rm repeatmaskerlibraries-*.tar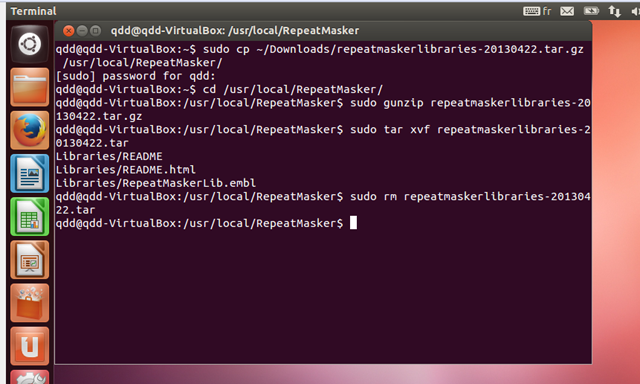

Installing the NCBI nt database (optional for running pipe4)
- Open a terminal (as for installing RepeatMasker)
and make a folder /usr/local/nt/ and change folder by typing (or copying)
the following commands:
sudo mkdir /usr/local/nt/
cd /usr/local/nt/ - Download the database:
sudo wget ftp://ftp.ncbi.nlm.nih.gov/blast/db/nt*
This step is long (>15GB). It is better to download the files overnight.
- Check the integrity of the downloaded files:
sudo md5sum –-check nt.*.tar.gz.md5
You should see OK for each of the xxx.tar.gz files
- Unpack the files:
sudo tar -zxvf nt.00.tar.gz
Repeat this opartion to all nt.##.tar.gz files
- Remove packed files and md5 files:
sudo rm nt.*.tar.gz*
Installing QDD command line version on Linux
- Extract QDD files to a folder (if installing QDD into an existing
galaxy server, this folder should be ../galaxy-dist/tools/qdd.
For command lines below I will use /usr/local/qdd)
mkdir /usr/local/qdd
cd /usr/local/qdd
tar -xvfz qdd.tar.gz - Install Perl, blast+, clustalW2, Primer3, RepeatMasker (optional), bioperl (optional), NCBI nt database (optional)
- Perl ( http://www.perl.org/get.html). It is likely that Perl is already installed. To check it type 'perl -v' on the command line.
- Bioperl ( http://www.bioperl.org/ ; It is only necessary for contamination check
- BLAST+ ( ftp://ftp.ncbi.nih.gov/blast/executables/blast+/; Use BLAST+ not BLAST)
- ClustalW ( ftp://ftp.ebi.ac.uk/pub/software/clustalw2/) Use clustalw2 and not formerly widely used clustalw1.83.
- Primer3 ( http://primer3.sourceforge.net/) You can use either the more recent version 2 of Primer3 or an older Primer3-1.1.4 version.
- RepeatMasker ( http://www.repeatmasker.org/) Optional for checking similarities to know transposable elements. When using RepeatMasker you also need a library of repetitive elements from GIRI ( http://www.girinst.org/). It is free only for academic users.
- Download NCBI nt database ( ftp://ftp.ncbi.nlm.nih.gov/blast/db/). For help see 'Installing NCBI nt database'. For contamination check you can either use a remote BLAST or a local BLAST. Only for the local BLAST you need to download this database, but it is recommended, if you are likely to have many sequences to test. (see Contamination check)
- Make a symbolic link to subprogramQDD.pm and ncbi_taxonomy.pm in
/etc/perl/subprogramQDD.pm
ln -s /usr/local/qdd/subprogramQDD.pm /etc/perl/subprogramQDD.pm
ln -s /usr/local/qdd/ncbi_taxonomy.pm /etc/perl/ncbi_taxonomy.pm - Make a hard link to set_qdd_default.ini in /etc/qdd/
(Beware! If you are re-installing qdd, remove the old link in /etc/qdd/ and make a new)
mkdir /etc/qdd/
ln /usr/local/qdd/set_qdd_default.ini /etc/qdd/set_qdd_default.ini - Edit the set_qdd_default.ini file to set parameters that are constant
(see details in Setting Parameters)
- Make sure the operating system is set to linux (syst=linux)
- Make sure galaxy is set to 0
- Set the full path to BLAST+, ClustalW, Primer3 and RepeatMasker executables (blast_path, clustal_path, primer3_path, rm_path). This step is necessary for Primer3 but you can ignore it for the other three software if they are in your PATH.
- Set the version of primer3 (primer3_version)
- Set the full path to the QDD scripts (qdd_folder) and the output folder that will contain temporary files (out_folder). This folder must exist before running QDD.
- If you are using local blast for contamination check, set local_blast to 1 and set the name and path of the downloaded ncbi database (blastdb)
- Set the number of threads (number of CPU) in num_threads (used for BLAST and RepeatMasker).
Installing QDD in command line version on Windows
- Untar and unzip QDD[version].tar.gz
into a folder where you would like to install it
For windows, you can use WinRar (http://freedownloadwinrar.org/) for decompressing the file. Keep all the files in one folder (referred to as qdd_folder in the parameters). Choose a place for your qdd_folder with no space in the path, and avoid using file names with spaces in it.
- Install Perl, blast+, clustalW2, Primer3, bioperl (optional), NCBI nt database (optional)
- ActivePerl ( http://www.activestate.com/activeperl/ )
- Bioperl ( http://www.bioperl.org/ ; It is only necessary for contamination check. Help at http://www.bioperl.org/wiki/Installing_Bioperl_on_Windows
- BLAST+ ( ftp://ftp.ncbi.nih.gov/blast/executables/blast+/; Use BLAST+ not BLAST)
- ClustalW (
ftp://ftp.ebi.ac.uk/pub/software/clustalw2/) Use clustalw2 and not
formerly widely used clustalw1.83.
Install ClustalW2 using the msi file and keep the files within the folder selected during the installation process. - Primer3 ( http://primer3.sourceforge.net/) You can use either the more recent version 2 of Primer3 or an older Primer3-1.1.4 version, which is easier to install in windows.
- Download NCBI nt database (
ftp://ftp.ncbi.nlm.nih.gov/blast/db/).
For contamination check you can either use a remote BLAST or a local BLAST.
Only for the local BLAST you need to download this database, but it is recommended,
if you are likely to have many sequences to test.
(see Contamination check)
- Open a terminal. (Program =>Accessories => Command Prompt)
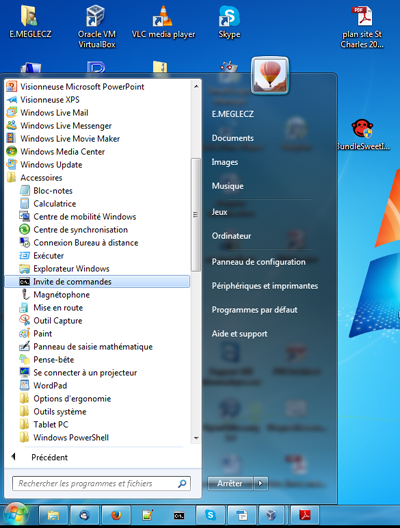
- In the terminal type:
perl [blast_path]update_blastdb.pl nt
- Decompress the downloaded files. You can use WinRar ( http://freedownloadwinrar.org/) for decompressing the files under windows.
- Open a terminal. (Program =>Accessories => Command Prompt)
- Edit the set_qdd_default.ini file to set parameters that are constant
(see details in Setting Parameters)
- Make sure the operating system is set to windows (syst=win)
- Make sure galaxy is set to 0
- Set the full path to above installed executables after the appropriate parameter names (blast_path, clustal_path, primer3_path)
- Set the version of primer3 (primer3_version)
- Set the full path to the QDD scripts (qdd_folder) and the output folder that will contain temporary files (out_folder). This folder must exists before running QDD.
- If you are using local blast for contamination check, set local_blast to 1 and set the name and path of the downloaded ncbi database (blastdb)
- Set the number of threads (number of CPU) in num_threads (used for BLAST).
Installing QDD into an existing local Galaxy server
- Modify the ~/galaxy-dist/tool_conf.xml file to include QDD tool xml files.
Afteradd: <section name="QDD" id="QDD3">
<tool file="qdd/QDD_pipe1.xml" />
<tool file="qdd/QDD_pipe2.xml" />
<tool file="qdd/QDD_pipe3.xml" />
<tool file="qdd/QDD_pipe4.xml" />
</section> - Follow the same steps as Installing QDD in command line version for Linux. Except for setting galaxy to 1 in the set_qdd_defaults.ini file.
Setting Parameters before the first run
The default parameters of QDD are stored in set_qdd_default.ini file. You should edit this file for changing default settings that depend on your computer configurations and file locations (e.g. path to executables, Primer3 version, directory for output files).
Lines starting by # are comments to give you the meaning of the parameters in the next line(s)
All other lines set one parameter at a time. The name of the parameter is followed by '=' then by the value of the parameter. Do NOT change the name of the parameter or delete the equal sign.
If the executables of BLAST+, CLUSATW2, Primer3 and RepeatMasker are not in your $PATH, give the full path to these software after the appropriate parameter name. Otherwise you can leave these values empty.
Although you can set all parameters in the command line at every run, the following parameters are likely to be stable for all runs, thus better to be edited in the set_qdd_default.ini file:
# run QDD from galaxy server; 1 for yes 0 for running QDD from terminal
galaxy=0
#operating system [linux/win]
syst =
# Full path to blast executables (including the bin folder) e.g.
C:\Program Files\NCBI\blast-2.2.25+\bin or /home/EM/blast/bin)
If the folder is in your path it can be left empty.
blast_path=
# Full path to clustalw executables. If the folder is in your path it can be left empty.
clust_path =
# Full path to primer3_core executable.
(e.g. C:\primer3-1.1.4-WINXP\bin)
primer3_path =
# Primer3 version [1/2]
primer3_version =
# Full path to qdd scripts
qdd_folder =
# Output folder name with full path. Must exist before run.
If not specified output files are written in the current working directory
out_folder =
#[0/1] (1 for deleting temporary files after the run)
del_files =1
#[0/1] (1 for printing out supplementary information, only needed for debugging)
debug = 0
# name (including full path) to a local database
(nt of NCBI; e.g. /usr/blastdb/nt); Only needed if local BLAST is used for contamination check
blastdb = d:\blastdb\nt
#number of threads for BLAST and RepeatMasker (number of CPU)
num_threads = 1
# [0/1] 1:run local blast for contamination check; 0:run remote blast for contamination check
local_blast = 0
#PIPE4 SPECIFIC PARAMETERS
# Full path to RepeatMasker executables.
(e.g. /usr/local/RepeatMasker/) If the folder is in your path it can be left empty.
rm_path = /usr/local/RepeatMasker/