Running QDD-Galaxy
- Start up the galaxy server.
- Open a terminal (by clicking on the Ubuntu icon in the top left corner of the VM display and type 'terminal' in the search box)
- Type in the terminal:
cd ~/galaxy-dist/
sudo sh run.shYou will be prompted to type the password (qddGalaxy).
You will see plenty of messages on the screen.
Wait till you seeserving on http//127.0.1:8080
- Leave the terminal open. You can close it by typing Ctrl C only when you have finished with the Galaxy server.
- Connect to the local galaxy server from your web browser at http://127.0.0.1:8080/
- When Galaxy starts you will find 3 panels
- The left shows you the different tools available
- The right shows the files in your history
- The middle contains different information according to the context (help and input settings for the tools, contents of the output files)
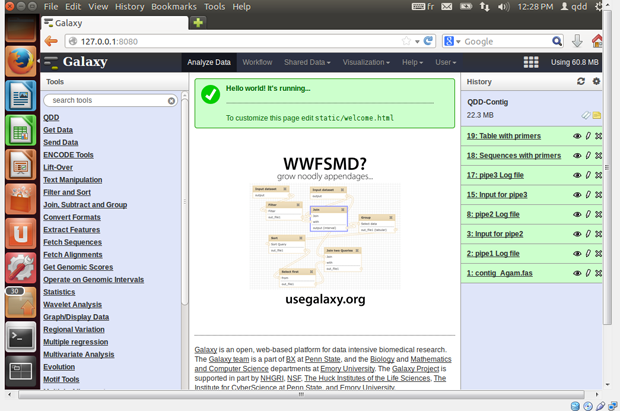
- Create an account in the User menu (black line on top of the page),
so you can save your histories, workflows, share you data etc.
If you are using Galaxy in the VM there is already an account you can use. It already contains qdd workflows and sample histories:
- Email: qddGalaxy@gmail.com
- Pwb: qddGalaxy
- public name: qdd-galaxy
- First you need to send your data files to Galaxy.
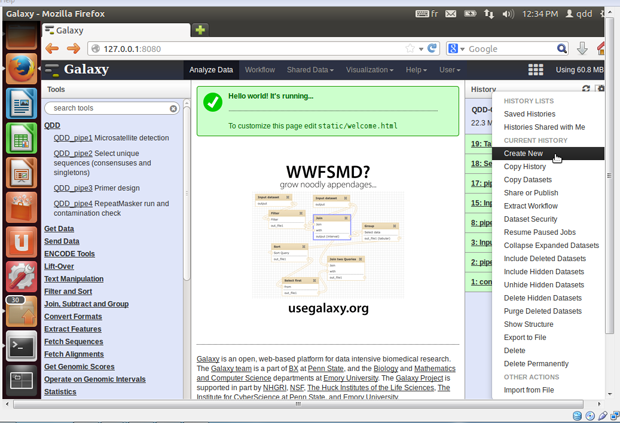
- Create a new history by clicking on the dented wheel on
the top right, and selecting 'Create New'.
- User =>Saved histories => Rename
You can rename your history by selecting 'Saved histories' in the 'User' menu, and selecting and renaming your current history.
- Get Data => Upload file
Select 'Upload file' from the 'Get Data' menu in the left panel.
You can either use the browser to find the file in your computer, or copy the URL from which it can be uploaded.
When first using Galaxy it is better to use the example files found in /home/qdd/galaxy-dist/tools/qdd/data of the VM.
To get your own files to the VM, you can either
- Set up a shared folder between the host system and the guest system (see documentation at www.virtualbox.org) or
- use an external drive.
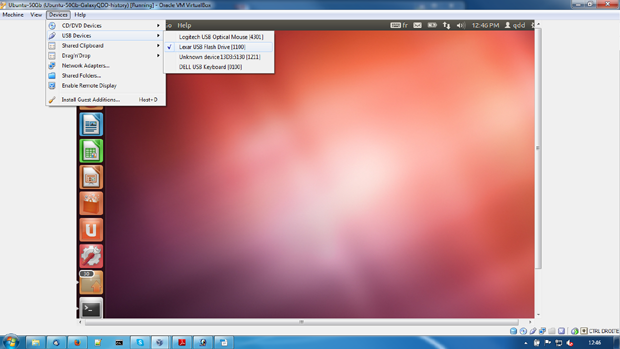
- Devices => USB devices => your drive
From the menu Devices/USB devices select the external drive with your data on. The drive will be available to the VM but not for your host machine.
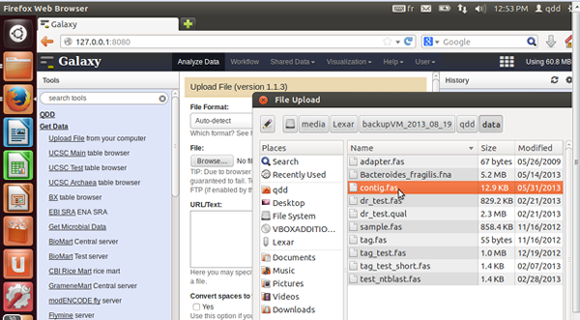
- To get data to galaxy directly from your external drive,
use the browse button to find your drive in /media/.
- Create a new history by clicking on the dented wheel on
the top right, and selecting 'Create New'.
- You are ready to run QDD. You can either run a workflow or run the four pipes one after the other.
- Running QDD pipes one by one
- Select pipe1 form the QDD menu on the left panel and set
the input parameters in the middle panel and execute the program.
- The input fasta file is compulsory.
- Choose the sequence type (contigs or reads). This will alter the parameters you need to set.
- The help at the bottom of the middle panel gives a short description of pipe1.
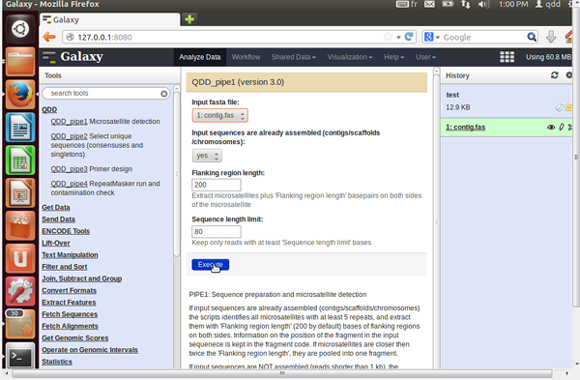
- Once the run is finished, the output files are found in the right panel.
- You can check them by clicking on the eye icon next to the file name. The beginning of the file appears in the middle panel.
- You can rename them by clicking on the pencil next to the file name.
- You can download them by clicking on the file name and then on the download icon that appears.
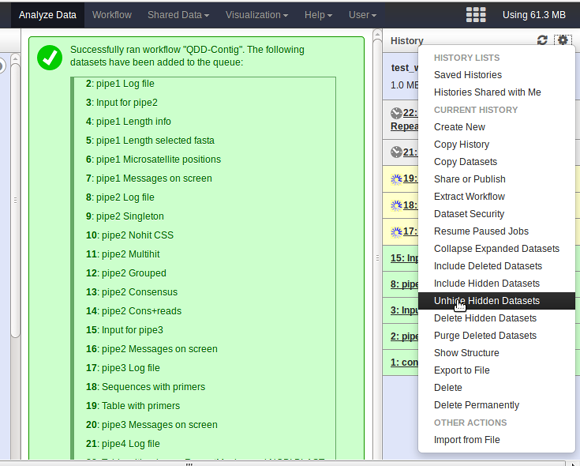
- QDD produces more files than the ones that appear by default. If you want to see all of them, you can click on the dented wheal icon (top right) and select the 'Unhide Hidden Dataset' option.
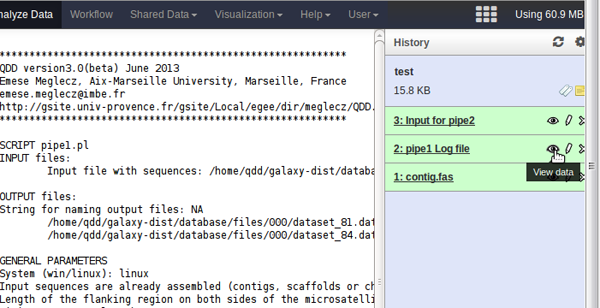
- You can run pipe2, 3 and 4 in the same way.
- The input file for the pipe2 is the output of pipe1 Input for pipe2.
- The input file for the pipe3 is the output of pipe3 Input for pipe3'
- The input file for the pipe4 is the Table with primers produced by pipe3.
- Select pipe1 form the QDD menu on the left panel and set
the input parameters in the middle panel and execute the program.
- The most important output files are
- Table with primers and Table with primers, RepeatMasker
and NCBI BLAST info which are a tab delimited tables that
contains primer pairs and a lot of supplementary information
to help you to choose the markers and the primers that best suite you.
See for details in the Output files section.
These files can be easily opened in excel once downloaded. - Sequences with primers.
- Do not neglect the log files, that contain all the input parameters and summary information on the results.
- Table with primers and Table with primers, RepeatMasker
and NCBI BLAST info which are a tab delimited tables that
contains primer pairs and a lot of supplementary information
to help you to choose the markers and the primers that best suite you.
See for details in the Output files section.
- Running QDD as a workflow
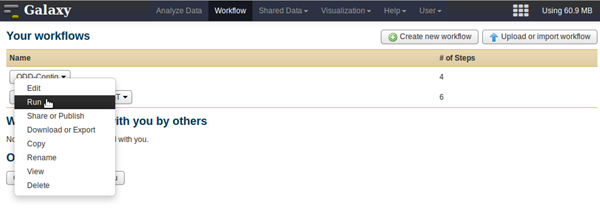
- You can access your workflows by choosing the Workflow in the menu on the top of the page. For using workflows, you have to be logged in (User in the top menu).
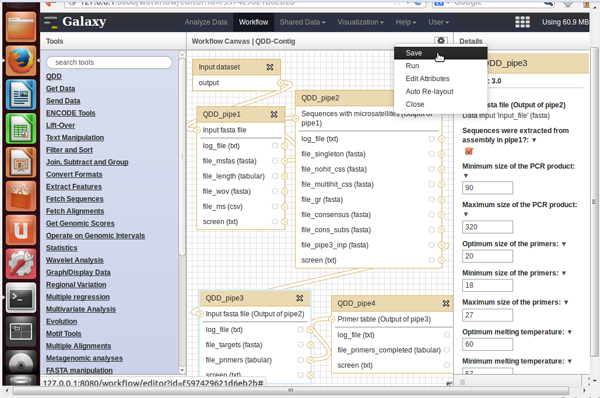
- You can edit or run a workflow by clicking on the triangle next to its name
- When editing the workflow, click on the block representing the step you want to edit. In the right panel you can change the input parameters. Do not forget to save your modifications (top right).
- Once edited, you can run the workflow.
- Select a history, or make a new one with your input files in it.
- Choose the Workflow menu (in black top menu bar), select the workflow you want to run, and select run.
- In the middle panel you can check again the input parameters, but you cannot modify them.
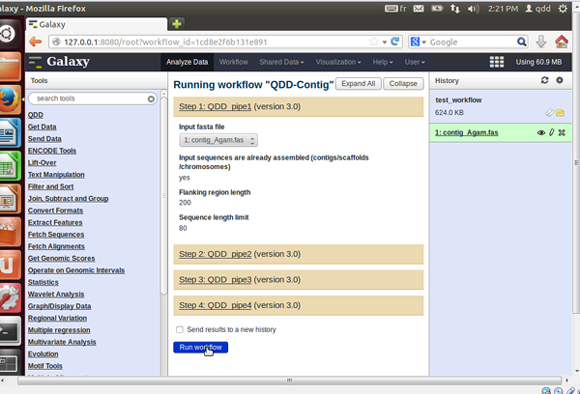
- The output files appear in the right panel.
- When it seems too long...
- Galaxy sometimes appear to be blocked, but usually it is only the right lane panel that is not refreshed. You can click to the double arrow icon on the top right to refresh this panel.
- While a script is running, you can see the output files in yellow,
with a turning wheel showing that galaxy is working. If you would
like more information, you can unhide the hidden files, and look
at the file pipeX messages on screen to have more
information on the steps being executed.
This file can also contain error messages if something turns wrong. - If you have plenty of sequences with primers, pipe4 can take hours or days to finish. The most important results you already have in the Table with primes. Pipe4 will complete this file with RepeatMasker and NCBI BLAST information. It is up to you to decide how important it is for you to get this supplementary information.

Running QDD on command line
Pipe1-4 can be run separately or all in one go.
In both cases, default parameters are read from
set_qdd_default.ini file but they can be overwritten
by using command line options.
See examples below.
Running pipe1-4 separately
- Open a terminal
Help windows (START =>Program =>Accessories => Command Prompt), Help linux - Change directory in a terminal to the qdd folder (that contains the scripts; e.g. cd d:\QDD)
- Make sure that the out_folder in set_qdd_default.ini is set to an existing folder. If not, modify the setting or create the folder.
- Run pipe1.pl, pipe2.pl, pipe3.pl and pipe4.pl
- The general syntax for running these scripts is
perl pipeX.pl -parameter_name parameter_value
- The -input_file option is compulsory, all others are optional.
- If a parameter is not specified in the command line, the default value specified in the set_qdd_default.ini file is used
QDD.pl
Run all pipes in one go / batch submission / sorting sequences by tags
QDD.pl runs the four pipes one after the other, handles batch submission and can sort sequences in the input files according to tags. The tag sorting option is available only in command line option and not in QDD-Galaxy.
The general syntax is
perl QDD.pl -parameter_name parameter_value
- Batch submission: in QDD.pl instead of one input file
(-input_file) an input folder should be set (-input_folder).
This enables users to run many files in one go without giving each file name separately.
- The input_folder should contain all and only the input files (without the adapter or tag file) and they will be run one after the other.
- You have to use -input_folder even if you have only one input file.
- The -input_file option does not exists in QDD.pl.
- The option -run_all set to 1 prompts QDD to run all
4 pipes one after the other for all files in the input folder.
If -run_all is 0 only the tag sorting is done (see bellow)
perl QDD.pl -input_folder data/ -run_all 1
- The option -tag set to 1 prompts QDD to sort sequences
in the input file(s) according to tags.
In this case -tag_file should be set to the name of the fasta file (including path) containing all tags.
- Apart from the -input_file and -outfile_string parameters, all other parameters described for pipe1-4 are also valid for QDD.pl
Examples for running QDD from the command line
Example1
You have an assembly (there might just be contigs) of an insect genome and you want to compare the sequences with successful primer design to known transposable elements. Since you have done your assembly correctly, you do not need to check the contamination.
You have set the different paths in the set_defalut_qdd.ini, but let all the other default values:
Download input and output files of example1 here.
perl pipe1.pl -input_file c:\qdd_data\example1.fas -contig 1
- Microsatellites are extracted with 200 bp flanking regions
on both sides and found in the c:\qdd_output\example1_pipe1_for_pipe2.fas.
You can change the flanking region length by setting -flank_length
perl pipe2.pl -input_file c:\qdd_output\example1_pipe1_for_pipe2.fas -make_cons 0
- Since you started from an assembly, it does not make sense to make consensus sequences (-make_cons 0). Sequences are, however, compared to each other and only the ones with no similarity to the others are kept, to avoid paralogs. The unique sequences are found in c:\qdd_output\example1_pipe2_for_pipe3.fas
perl pipe3.pl -input_file c:\qdd_output\example1_pipe2_for_pipe3.fas -contig 1
- After the iterative primer design, the sequences with primers are found in c:\qdd_output\example1_pipe3_targets.fas, and the Primer table in c:\qdd_output\example1_pipe3_primers.tabular.
- -contig 1 tells QDD that the sequences have been extracted from assemblies, and it adds two columns to the primer table with the Id of the contig and the first position of the extracted fragment on the contig. When selecting markers, you should avoid closely linked markers.
perl pipe4.pl -input_file c:\qdd_output\example1_pipe3_primers.tabular -rm 1 -rm_lib insecta
- The sequences with primers are screened by RepeatMaster (-rm 1) against the know transposable elements of insects (-rm_lib insecta). You can choose almost any clades for rm_lib. On starting pipe4, QDD checks if the name of the group is valid, and gives you suggestions for a valid name, if it is not.
These four steps can be done all at once by running QDD.pl
perl QDD.pl -input_folder c:\data_example1 -contig 1 -make_cons 0 -rm 1 -rm_lib insecta
- The default of -run_all is 1, so you do not need to specify it. It runs all four pipes, one after the other.
- Since the default value of -check_contamination is 0 in pipe4, sequences will not be blasted against the NCBI nucleotide database.
- -input_file is not valid in QDD.pl, you should specify the input folder instead (-input_folder c:\data_example1), that contains the input file(s) but nothing else. If there are several files in the input folder, they are all analysed one after the other.
Example2
You have 454 reads in a fasta file. Adapters have already been removed from your sequences. You would like to check contamination by blasting the putative markers against genbank as a remote BLAST, since you have not downloaded the nt databases of the NCBI. You do NOT want to screen for transportable elements, since (i) you are working on windows (ii) and you have an exotic taxonomic group where there is little info on existing transposable elements anyway.
You have set the different paths in the set_defalut_qdd.ini, but let all the other default values:
Download input and output files of example2 here.
perl pipe1.pl -input_file c:\qdd_data\example2.fas
- Sequences that contain a microsatellite and longer than 80 bp (-length_limit 80 by default) are found in c:\qdd_output\example2_pipe1_for_pipe2.fas
perl pipe2.pl -input_file c:\qdd_output\example2_pipe1_for_pipe2.fas
- The unique sequences ( singletons and consensus sequences) are found in c:\qdd_output\example2_pipe2_for_pipe3.fas
perl pipe3.pl -input_file c:\qdd_output\example2_pipe2_for_pipe3.fas
- c:\qdd_output\example2_pipe3_primers.tabular contains information on the primer pairs, sequences, and target regions.
perl pipe4.pl -input_file c:\qdd_output\example2_pipe3_primers.tabular -check_contamination 1
- The sequences with primers are BLASTed against the nt database of NCBI by remote BLAST (-local_blast is 0 by default). This need a good internet connection, and a lot of time.
- Info on the best hits to nt is added to the primer table (example2_pipe3_primers.tabular) and found in c:\qdd_output\example2_pipe4_primers.tabular.
These four steps can be done all at once by running QDD.pl
perl QDD.pl -input_folder c:\data_example2 -check_contamination 1
- The default of -run_all is 1, so you do not need to specify it. It runs all 4 pipes, one after the other.
- -input_file is not valid in QDD.pl, you should specify the input folder instead (-input_folder c:\data_example2), that contains the input file(s) but nothing else. If there are several files in the input folder, they are all analyzed one after the other.
Example3
You have one or more files with 454 reads that contain tags at the beginning of the sequences that identify the origin of the sequence, and thus sequences need to be sorted into separate files according to tags.
You have adapters to be removed from your sequences (after sorting them by tag)
You would like to check contamination by blasting the putative markers against the nt database of ncbi, that you have downloaded and extracted on your computer and set the name and the location of this database (-blastdb) in the set_defalut_qdd.ini as well as -local_blast to 1.
You have set the different paths in the set_defalut_qdd.ini, but let all the other default values (except for -local_blast 1).
Download input and output files of example3 here.
Tag sorting step can be done only by QDD.pl and not by pipe1.pl
perl QDD.pl -input_folder c:\data_example3 -tag 1 -tag_file c:\myfolder\tag.fas -adapter 1 -adapter_file c:\myfolder\adapter.fas -check_contamination 1
- -input_file is not valid in QDD.pl, you should specify the input folder instead (-input_folder c:\data_example3), that contains the input file(s) but nothing else.
- Sequences in the fasta files are sorted according to the
tags (-tag 1) that are found in c:\myfolder\tag.fas.
Beware! The tag.fas is NOT in the input folder (c:\data_example3) - Then each of the resulting files are analyzed by pipe1-4, since the default of -run_all is 1
- -adapter 1 prompts the program to clip the adapters
(c:\myfolder\adapter.fas) form the sequences.
Beware! The adapter.fas is NOT in the input folder (c:\data_example3) - -check_contamination prompts the program to blast the sequences with markers (c:\qdd_output\xxx_targets.fas) against the nt database you have downloaded (you have set -local_blast to 1 in the set_qdd_deafult.ini file).
Example4
You have Illumina or Ion Torrent
low coverage data in fastq format,
thus assembling the reads does not make sense.
You have trimmed off low quality regions of the reads.
You would like to check contamination by blasting the putative
markers against genbank as a remote BLAST,
since you have not downloaded the nt databases of the NCBI,
and you would also like to compare the sequences with successful primer
design to known transposable elements of vertebrates.
You have set the different paths in the set_defalut_qdd.ini, but let all the other default values:
Download input and output files of example4 here.
perl pipe1.pl -input_file c:\qdd_data\example4.fas -fastq 1
- -fastq 1 will prompt QDD to convert the input fastq file to fasta
- Sequences that contain a microsatellite and longer than 80 bp (-length_limit 80 by default) are found in c:\qdd_output\example4_pipe1_for_pipe2.fas
perl pipe2.pl -input_file c:\qdd_output\example4_pipe1_for_pipe2.fas
- The unique sequences ( singletons and consensus sequences) are found in c:\qdd_output\example4_pipe2_for_pipe3.fas
perl pipe3.pl -input_file c:\qdd_output\example4_pipe2_for_pipe3.fas
- c:\qdd_output\example2_pipe3_primers.tabular contains information on the primer pairs, sequences, and target regions.
perl pipe4.pl -input_file c:\qdd_output\example4_pipe3_primers.tabular -check_contamination 1 -rm 1 -rm_lib vertebrates
- The sequences with primers are BLASTed against the nt database of NCBI by remote BLAST (-local_blast is 0 by default). This need a good internet connection, and a lot of time.
- The sequences with primers are screened by RepeatMaster (-rm 1) against the know transposable elements of vertebrates (-rm_lib vertebrates). You can choose almost any clades for rm_lib. On starting pipe4, QDD checks if the name of the group is valid, and gives you suggestions for a valid name, if it is not.
- Information on the best hits to nt and to the Repeatmarker database is added to the primer table (example4_pipe3_primers.tabular) and found in c:\qdd_output\example4_pipe4_primers.tabular.
These four steps can be done all at once by running QDD.pl
perl QDD.pl -input_folder c:\data_example4 -fastq 1 -check_contamination 1 -rm 1 -rm_lib vertebrates
- The default of -run_all is 1, so you do not need to specify it. It runs all 4 pipes, one after the other.
- -input_file is not valid in QDD.pl, you should specify the input folder instead (-input_folder c:\data_example4), that contains the input file(s) but nothing else. If there are several files in the input folder, they are all analyzed one after the other.